

Published June 27, 2026 03:00AM
Maybe your upper back aches after cycling. Or your knees bark whenever you hike uphill or hit the trails for a run. Perhaps your neck twinges every time you swing your pack over your shoulder. In other words, pain accompanies movement. Even if it’s not always debilitating, it still sucks.
Many factors can cause your body to ache as you move, but for outdoor athletes or people who exercise, it often happens when your muscles, tendons, and other tissues get overloaded, says Tom Walters, an orthopedic physical therapist and author of Rehab Science: How to Overcome Pain and Heal from Injury.
Take trail running or hiking, for example. Those aren’t high-load activities–after all, you’re not moving super heavy weights as you stride–but outdoor athletes often do these activities in a really high volume, tackling dozens of miles a week. Your tissues need to be strong enough to handle all that endurance work, Walters explains, and when they’re not, pain and injury can crop up.
Fortunately, doing certain strength exercises can mitigate this discomfort by increasing your tissue capacity, which refers to how much your tissues and muscles can withstand force or impact without being injured. Stretches can help too by boosting overall mobility and promoting recovery in fatigued muscles.
We asked Walters for a roundup of strength moves and stretches to help you enjoy your usual activities with less pain in seven key areas of the body, as well as the red flags that warrant a call to a physical therapist (PT) or another doctor.
The following exercises and stretches are for mild pain, not severe or acute pain. If, on a scale of 1–10, your pain is a 3–4 or below, that is considered mild pain. If it’s a 5 or above, that’s moderate to severe pain, and these exercises are not for you; you should consult your doctor or PT. Also, if you’ve just suffered an acute injury where pain came on suddenly, you should see a doctor, Walters says. You should also see a PT if your pain doesn’t improve after two to three weeks, worsens at any time, or is accompanied by other symptoms such as numbness, tingling, or incontinence (poor bladder or bowel control).
7 Moves and Stretches to Relieve Pain All Over the Body
If you’re currently experiencing mild pain, do these moves every day, Walters suggests. They work great sprinkled into a warm-up before exercise, he says, but you can also do them separately from your workouts. Even if you’re not currently experiencing pain, these exercises are great to do one to two times a week to help reduce your chances of aches and injuries cropping up in the future, he adds.
Equipment Needed
To perform the exercises listed below, you’ll need:
- Dumbbell
- Foam roller
- A step or access to stairs
1. Lower Back Pain
Move: Bird Dog
Lower back pain is incredibly common, with most people experiencing it at some point in their lives. Cyclists, in particular, can be especially prone to it, since the forward-leaning posture they adopt on the bike (which involves flexing the lower back for long periods) can contribute to stiffness and pain in the area.
This exercise helps reduce lower back pain in two ways. The first way: doing the bird dog moves the lower back into extension (the opposite of flexion), which improves overall mobility. The second way: the bird dog also gently activates and strengthens the lower back muscles, which can help reduce pain from prolonged flexion.
(FYI: flexion means bending a joint, and extension means extending it. So, if you bend your knee, that’s flexion. If you straighten your leg, that’s extension.)
“It’s a good exercise for so many back pain issues,” Walters says. “Almost everyone could start with that and feel better.”
How to Do It:
- Start on all fours with your wrists under your shoulders and knees under your hips. Engage your core.
- Inhale, then exhale as you extend your right arm and left leg. Pause, then return to all fours.
- Inhale, then exhale as you extend your left arm and right leg. Pause, then return to all fours. This is one rep.
- Continue the above pattern, alternating sides, for 10 to 15 reps. Do three sets.
- Keep your core engaged the whole time to minimize movement in your torso.
2. Upper Back Pain
Move: Thoracic Extension Over Foam Roller
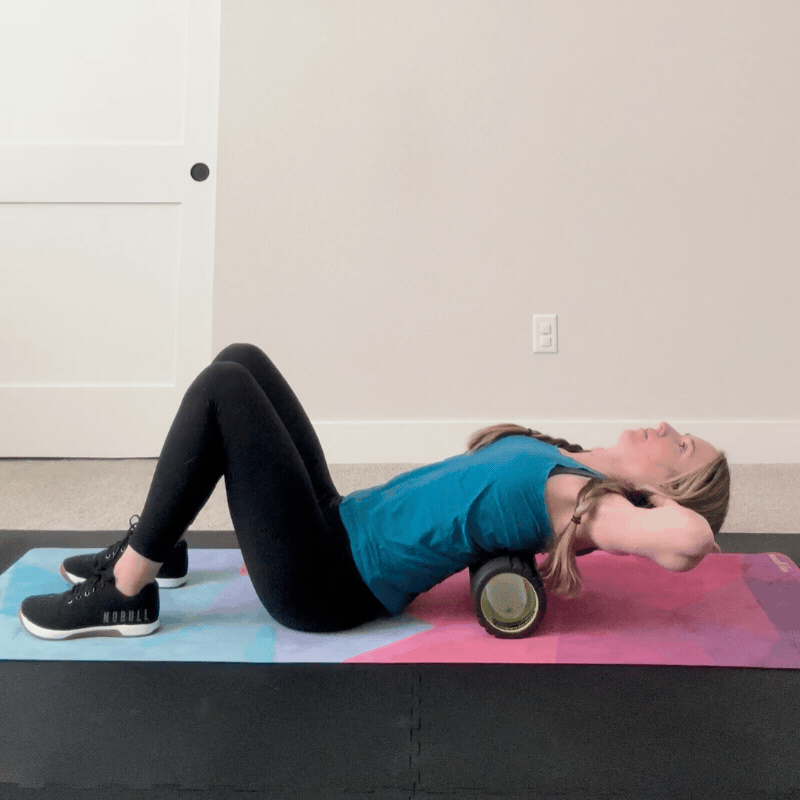
Upper back pain can crop up when that part of the spine is held in a rounded position for long periods. For example, when you’re hunched over the saddlebars on a long ride, or staring at the ground while running or hiking a technical trail.
In those scenarios, taking the thoracic spine (the technical term for the mid and upper back) into the opposite position (extension) “is one of the most helpful things you can do to reduce pain,” Walters says. This foam roller-assisted stretch does exactly that.
How to Do It:
- Lie on the ground with knees bent, feet flat on the floor, and a foam roller placed perpendicular to your spine. The foam roller should be placed under your back, between your shoulder blades, and mid-back.
- Place your hands behind your head to support your neck, or rest them on your chest.
- Arch your mid and upper back over the foam roller and hold for 10 to 20 seconds. Try not to arch your lower back much, but instead isolate the arch to the part of your back that’s in contact with the foam roller.
- Repeat for two to four holds.
3. Shoulder Pain
Move: Side-Lying Dumbbell External Rotation

Your rotator cuff is made up of four muscles, which help keep the shoulder joint in its normal, neutral alignment, Walters explains. When these muscles have a strength or endurance deficit, they’re not able to do their job as effectively, and other nearby structures—such as the labrum, shoulder joint capsule, or other tendons—can take on extra stress as a result, triggering shoulder pain, he says. In the outdoor world, shoulder pain can be especially common among swimmers, rowers, and racquet sports players, Walters says.
This exercise targets two of the rotator cuff muscles and is one of the top moves that “can reduce lots of different types of shoulder pain,” Walters says.
How to Do It:
- Lie on one side and tuck your top elbow into your side, bending it to 90 degrees so your hand rests by your stomach. Hold a light dumbbell or other form of external load (like a water bottle) in that hand. You can also start with just bodyweight. This is the starting position.
- Keeping that elbow at your side, bent to 90 degrees, rotate your arm away from your body as far as you can comfortably. Pause, then return to the starting position. This is one rep.
- Do 15 reps, then switch sides and repeat.
- Complete three sets.
It’s OK if your range of motion is limited with this exercise at first. Focus on working in a range that doesn’t cause pain, and over time, gradually increase that range.
4. Neck Pain
Move: Neck Flexor Isometric Curl
Most of us use our neck extensors (muscles on the back of the neck) a lot—especially when we crane our heads forward while cycling or look at the ground while hiking or running—but we neglect our neck flexors (muscles on the front of the neck). And weakness in the neck flexors can increase your chances of generalized neck pain, Walters says.
The neck flexor isometric curl takes the neck out of extension, altering the stress on the neck and targeting the neck flexors to improve the neck’s strength capacity, he explains. Both of those benefits can reduce neck pain.
How to Do It:
- Lie on your back and tuck your chin so that you give yourself a double chin. Holding the chin tuck, lift your head until it just clears the ground. Think about your hair still touching the ground, but your skull lifting up.
- Hold this position as long as you can.
- Do 3 to 5 reps, holding as long as you can. Gradually try to increase the hold times.
In people without neck pain, the average hold time is about 40 seconds, but if you have pain, you may only be able to hold for five to 10 seconds initially, which is perfectly fine.
5. Knee Pain
Move: Lateral Step-Down
Knee pain can be really common among hikers, runners, and cyclists. Strengthening the quads and glutes can help reduce discomfort, as these muscle groups help stabilize the knee joint and protect it from excessive stress. The Lateral Step-Down exercise targets both the quads and glutes.
As you do it, make sure your pain stays in the mild range, which Walters describes as a 3 or 4 on a scale of 1 to 10. To stay in this range, you may not be able to complete the move with a full range of motion—and that’s OK, he says. Work within a range that feels comfortable, and then gradually increase over time as your symptoms improve.
How to Do It:
- Stand sideways on a stair or low exercise bench with the leg experiencing knee pain firmly on the stair, keep a soft bend in that knee, and the other leg/foot should be hovering over the floor. Lean forward slightly with your trunk to help engage your glutes. This is the starting position. (As your pain decreases, you can adjust your trunk angle to be more upright.)
- Bend your grounded leg to sink into a mini squat, lowering down until you touch your opposite heel on the floor.
- Pause, then press through your grounded foot to return to the starting position. This is one rep.
- Do 15 reps, then switch sides and repeat.
- Complete three sets.
- Gradually increase to 25 reps per side.
6. Foot Pain
Move: Calf Stretch
Many outdoor athletes experience plantar fasciitis, which involves irritation and degeneration of the thick band of tissue (called the plantar fascia) on the bottom of the foot. Calf tightness is one of the top factors that predispose people to plantar fasciitis, Walters says. That’s because tight calves limit your ankle dorsiflexion (ability to pull your toes towards your nose), which in turn places more force on the plantar fascia.
This stretch helps lengthen tight calves, which can reduce strain on the plantar fascia.
How to Do It:
- Start in a stance with one leg stepped back several feet, both feet facing forward. Bend your front knee slightly while keeping your back leg completely straight.
- Lean forward and press your back heel into the ground to feel a stretch in the calf on your back leg.
- Hold for 15 to 30 seconds, then switch sides.
- Do two to four holds on each side.
7. Leg Pain
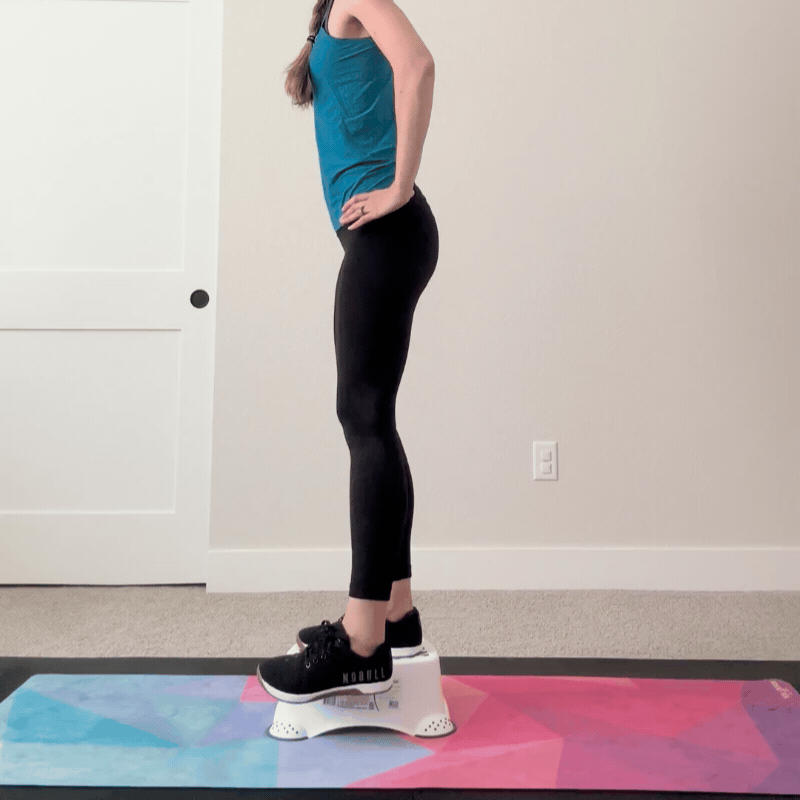
Move: Calf Raise
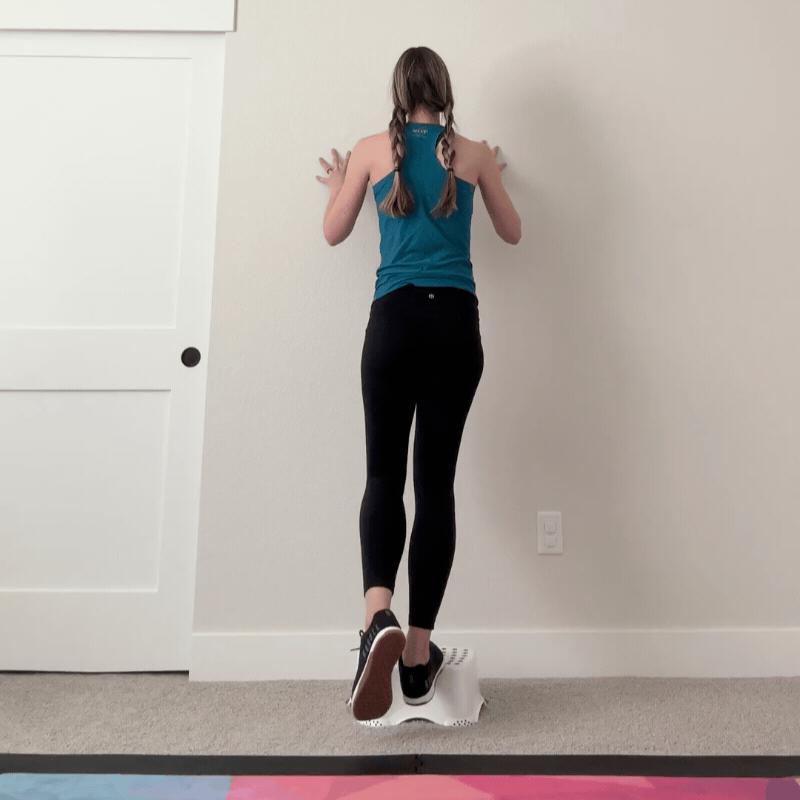
Many runners and hikers who come to Walters’s clinic have Achilles tendon pain, which can occur when the tendon is overloaded by propelling them up miles of trail.
Single-leg calf raises help strengthen the calves and Achilles tendons, increasing the capacity of those tissues to handle load. In fact, calf raises are “probably the best single exercise you could do for pain in the ankle region,” Walters says. If single-leg calf raises are too intense, start with double-leg calf raises and then progress to weighted double-leg calf raises.
How to Do It:
- Stand tall on an elevated step with feet together, facing a wall. Lift one foot off the ground and drop the opposite heel off the edge of the step. Lightly rest your hands on the wall for balance support. This is the starting position.
- Press through the front of your grounded foot to raise that heel straight up. Pause at the top, then slowly lower back to the starting position. This is one rep.
- Do 15 reps on each side to start, and complete three sets. (The goal is to eventually do 25 reps on each side per set.)
- Once 25 reps per side feel easy, up the challenge by holding a dumbbell in one or both hands.
Want more Outside health stories? Sign up for the Bodywork newsletter.